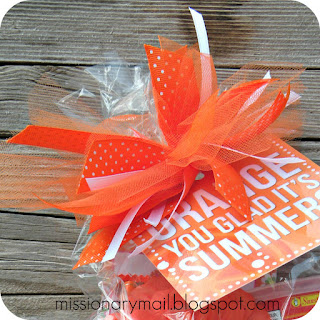
This package was SO fun to put together. Pretty simple and pretty inexpensive and SO CUTE!! Orange makes me smile. It's just so...HAPPY!! After the long, dreary winter this package is sure to bring a smile to the face of your missionary. How could it not? It's CUTE!!
Materials Needed:
orange shredded paper
cellophane bag
coordinating ribbon/tulle
(at least three styles suggested)
orange STUFF!
It's really pretty easy to fill these cute little bags. Put a bit of shredded paper in the bottom of the sack. It will protect the items that you put inside and make it look a bit nicer. Look around the store or your home for things that are orange. You don't have to include a lot to make the bag look pretty full. For the Sister missionaries I included an orange flower that has a clip on it...they probably won't use it in their hair (not really the current style) but they could clip it on a sweater or blouse or on their shoulder bag, orange fingernail polish (mission rules vary on this depending on the mission president but they can always paint their cute little toes!), there are also orange EOS lip balms and orange tubes of mascara...go wild!! You could also include and orange tie for the Elders as well as a small spiral orange notebook, an orange pen (the ink wouldn't be orange, just the outside silly). Of course you would include a few treats: Reese's candy bars, orange flavored Tootsie Rolls, Orange Slice candy, Orange gummie rounds, orange suckers, orange Tic Tac's...Cheez-it's also come in an orange package. Make it fun, easy and inexpensive! Print off the cute bag tag (see below) and tie a fluffy bow on the top and you're good to go. Don't know how to tie a 'cute fluffy bow'? It's a cinch! Just watch...

#1 - Punch a hole in the top of your bag tag where shown. Collect coordinating ribbon/tulle in various widths. I suggest at least three different styles. Cut one piece of ribbon about eight inches long and set aside (this is used to tie your sack closed in step #4). Stack all of the other ribbons/tulle on top of each other matching the ends as shown in the photo.
#2 - Spreading your fingers slightly apart, wrap the stack of ribbons around your fingers (see photo) at least three times. The more times you wrap them around your fingers the fuller the bow will be. Don't go too crazy or it might end up looking like a pom pom...unless that's the look you're going for in which case GO NUTS!!
#3 - Cut the ends. Don't worry about cutting it even with the ends. You can trim them up when you're finished. Set the ribbons aside. Just set something on top of it to hold in in place for a second...

#4 - Remember that eight inch piece of ribbon/tulle that you cut off at the beginning? Use it to tie your sack closed. Tie a knot so that it will stay tight for you...unless you have three hands or a helper...

#5 - Lay your stack of ribbon/tulle across the center of your knot...
#6 - ...and tie another knot to hold everything in place.
#7 - Your bow should now look something like this...
#8 - Slip your scissors through the loops of the ribbon/tulle and cut on both sides of the bow. Don't worry, you really can't mess this up...Using the ends of the longer ribbon that you used to tie everything together in step #4, thread on your bag tag
(see below) and tie securely. Trim the ends of the 'tie' ribbon.
#9 - Now just fluff and twist the pieces of ribbon into shape. Trim any longer ends remembering that we're not making a pom pom
(unless YOU are) and we don't want the whole thing to be too even. Viola! Aren't you talented!! Cute, huh? And easy! Told 'ya!!
Just copy onto heavy card stock. I laminated mine so it didn't tear through the card stock when I tied it onto my package but you could just put a piece of clear tape over the hole on both sides before punching it out.
Click here to download the bag tag
I also included this cute, inspirational 5x7 quote as a package topper.
It looks adorable framed don't you think?
Or unframed is also good...maybe you could include an orange magnet!
Click here to download the package topper.


